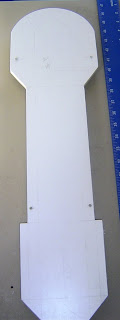
The measurements for the legs are in the pic below.
I also got all of the panels permanently glued onto the dome. I used 3m scotch tape and ISP Weld-on #3 to glue the edges of the panels, like we did for the panels on R3's body.
The rectangle drawn on the dome is where I will be cutting a hole through the outer dome for the logics.
Sunday, January 24, 2010
Friday, January 22, 2010
Fixing boo boos
Well, it seems we've run into a few screw ups from when I was cutting out the skins.
The first one is this:
When I was cutting the skins I did not know that I wasn't supposed to cut those square holes out you see in the picture above. *facepalm* (clone wars droids do not have these side vents)
Also, I almost forgot about the back vent so we had to cut out the hole for the vent and adjust the frame the hard way.
Here is a picture of the hole fixed.
Still got some bodywork to do on it, but once it's done and painted you won't even notice it. ;)
You can see the finished pocket vent in this pic.
And... WTF I don't even know how this happened.
Where the dataport is, I seem to have cut the inner skin wrong. So I will have to trim it down to be the same size as the outer.
Moral of the story: Study, study, study the reference pictures before you decide to do anything! And pay attention to what you're cutting when cutting out skins.
Building R3's legs
Sunday, January 3, 2010
Starting to look like an R3!
Mom and Dad before I even woke up this morning, decided to work on Goldie for me. :)
They used 3m scotch tape to permanently stick the outer to the inner skins.
Here is a picture of some of the panels and the arms taped to the skin.
Still got some sanding and other panels that need glue around the edges, but it's finally starting to look like an R3.
We used ISP Weld-on #3 glue for the edges of the panels.
Got some work done on the pocket vents also.
Saturday, January 2, 2010
Gluing inner skins to frame using Weld-on glue for styrene
The glue came in finally for our droids! But, a day later after we glued the inner skin to the frame...
This happens
The glue melted the plastic and created those flat spots and creases you see on the skin.
So we're probably going to end up tapeing the outter skins on like Brenda did with her R3-T7. http://r3t7.blogspot.com/2007/09/outer-skins-mounted.html
Hopefully all those bad spots won't show.
The pic above is the glue we used. (ISP WELD-ON #4807)
Subscribe to:
Posts (Atom)